Wednesday, October 19, 2011
Cricut Shape-A-Day #20
No matter what project you are working on, the Art Philosophy cartridge has a shape for you! With several pennant shapes to choose from, all you have to do is choose which to use!

Shape Instructions: Cut these simple pennants by setting your size dial to 5” and then pushing the second key from the right on the third row. To top it off, set your size dial to 3 ¾” and push the second button from the left on the bottom row to cut the decorative oval shape. Trim the bottom and top pieces off and attach it to your pennant base.
October 20, 2011 - DH
Cricut Shape-A-Day #19
When you use your Art Philosophy cartridge to cut out an envelope for your card, you can make an easy lining for your envelope by cutting the same envelope ¼” smaller on a coordinating B&T or cardstock. Trim off the side and bottom flaps and glue the lining inside the outer envelope before inserting your card. Little details like this can have a big impact on the recipient.

October 19, 2011 - DH
Cricut Shape-A-Day #18
Don’t you just love a few well-placed butterflies? These beautiful wings work wonders for this door hanger. And yep, they were all cut with the Cricut.

Shape Instructions: Add an intricate layer to your butterfly wings by pressing the “layer” feature key, then shift, and then the fifth button from the left on the fourth row. The large butterfly on this project is 2”. See page 55 in the Art Philosophy booklet.
October 18, 2011 - DH
Cricut - Shape - A- Day #17
It’s hard to pick a favorite from among the Art Philosophy flowers featured on today’s layout. Each flower you see was cut using the Cricut cartridge, and most were stamped with a stamp set that features six coordinating images – Hooray Bouquet (D1491). The end result is irresistible!

Shape Instructions: You’ll find these flowers on pages 29, 48, and 57 of your Cricut booklet. If you already have the Hooray Bouquet stamp set, you can find the appropriate sizes printed right on the carrier sheet.
October 17, 2011 -DH
Cricut Shape-A-Day #16
You may recognize this tag from the card I shared on day one. Now the tag is stand-alone and adorned by some more Cricut-cut shapes! You’ll notice that the green flourish on the center tree was made using the piece cut from the tree layer on the left. It’s like getting two shapes in one!

Shape Instructions: For the top layer piece, push the “Layer” feature key, shift, and then the first key on the second row. Refer to page 31 in the booklet.
October 16, 2011, DH
Cricut Shape-A-Day #15
Ready for more 3D excitement? The Art Philosophy cartridge can also cut this fun take-out box for you! It makes for a great container, or just a nice-looking decoration for your shelf.
Shape Instructions: Size 10 ¾”; Push the “Font layer” feature key, then shift, and then the fourth key from the left on the top row. You can see this on page 24 of your booklet.
October 15, 2011 - DH
October 15, 2011 - DH
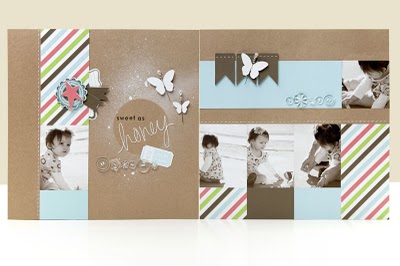
Cricut Shape-A-Day #14
The Art Philosophy cartridge brings a whole new set of possibilities to your artwork. The intricate cutting on these doilies would have been impossible with scissors, or even a craft knife. The Cricut makes it a piece of cake.
Shape Instructions: The largest of the doilies was cut at 5 ½”. Push the “Font layer” feature key, then shift, and then the third key from the right on the bottom row. Make sure you reduce your speed setting on these intricate cuts for the best results. Look at page 68 in the Art Philosophy booklet.
October 14, 2011 - DH
October 14, 2011 - DH
Cricut Shape-A-Day #13
One of my favorite things about the Art Philosophy cartridge is combining the Cricut shapes with coordinating stamp images. The sentiment on this card comes from the Holiday Cheer stamp set (B1381) and this image fits perfectly on one of the Art Philosophy shapes. Cricut and My Acrylix stamps – what a great combination!
Shape Instructions: Cut this shape by setting the size to 1 ¼” and pressing the 6th key over from the left on the third row. This key is highlighted on page 46 of your Cricut booklet.
October 13, 2011 -DH
October 13, 2011 -DH
Cricut Shape-A-Day #12
If you enjoy going out on limbs, you’ll love today’s shape. The leafy branch on this My Creations card box is an absolute delight to look at – and it was just as delightful to create!

Shape Instructions: Cut branch by setting your size dial to 2 ½” and pushing shift and the fifth button in from the left on the second row. Page 35 in the Art Philosophy booklet.
October 12, 2011 - DH
October 12, 2011 - DH
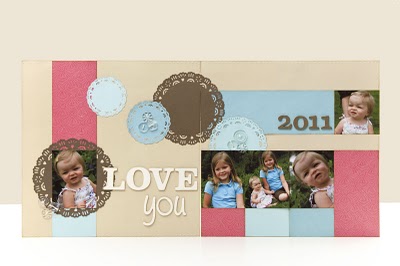
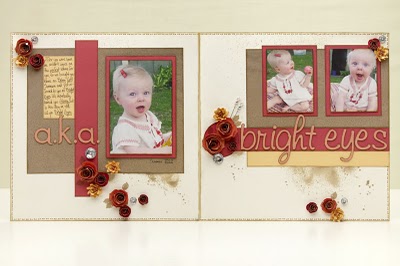
Cricut Shape-A-Day #11
There's so much to love in this layout, but I'm going to focus on another feature of the Art Philosophy collection – the complementary Dimensional Element shapes. Those banners on the right page were cut with the Cricut and attached to perfectly-coordinating pennants. The best part? The packaging tells you exactly what sizes to use!
Shape Instructions: Set the size to 2” and cut the banner shape by pushing the second key from the right on the top row. Look on page 29 of the booklet to see it.
October 11, 2011 - DH
Cricut Shape-A-Day #10
On the tenth day of my shape showcase, I’m featuring a project cut almost entirely with the Cricut. This card, the vase, the flowers, the envelope, and the envelope lining were ALL cut using the Art Philosophy cartridge! The cut-out in the center of this card allows for all kinds of layering – so get creative!

Shape Instructions: To cut this card, set the size to 4 1/2", push the “Card” feature key, and the sixth key from the left on the top row.
October 10, 2011 - DH
October 10, 2011 - DH
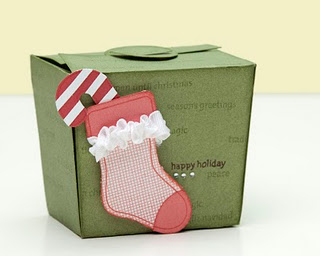
Cricut Shape-A-Day #9
Looking for an easy way to bag your Christmas goodies this year? Well the Art Philosophy cartridge and the Believe papers come together beautifully in this fun and festive container!

Shape Instructions: You can make this container by setting your size dial to 6” and pushing the “Font Layer” feature key, shift, and the third key from the left on the top row. See page 23 in your Cricut booklet.
October 9, 2011 - DH
October 9, 2011 - DH
Cricut Shape-A-Day #8
Today’s shape is one I’m particularly excited about – the spiral flowers! These beautiful flowers add a big pop to today’s layout. With just a little twirling and a dab of liquid glass, you can add these gorgeous paper blossoms to your projects, too!
Shape Instructions: You can cut these flowers in a variety of sizes; For the sorbet flowers, push the “Font” feature key, shift, and then the second key from the right on the bottom row. For the crème brulee flowers, push “Font” feature and the third key from the right on the bottom row. The flowers cut on the tulip cardstock can be cut using the same key by pushing the “Font” feature key and shift. To see what other flowers you can make, look at pages 68-70 in the Cricut booklet
October 8, 2011 - DH
October 8, 2011 - DH
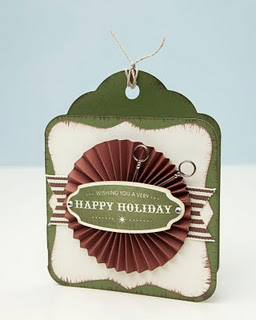
Cricut Shape-A-Day #7
Tags make great additions to gifts – they add just the right touch and keep the sentiments short and sweet. The Art Philosophy cartridge has loads of tags to choose from, with lots of fun layering options, too!
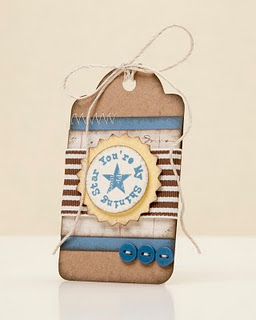
Shape Instructions: Cut this tag by setting the size dial to 4”, and pushing the last key on the right side of the third row. Page 50 in the booklet.
October 7, 2011 - DH
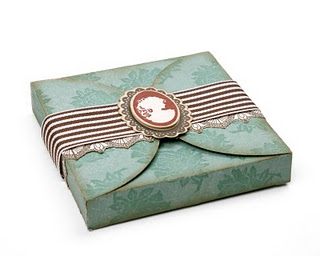
Cricut Shape-A-Day #6
Here is another of the Art Philosophy cartridge’s great 3-D offerings. This makes the perfect gift box and your Cricut will score and notch it for you. All you have to do is fill it, fold it, and give it away.

Shape instructions: Set the size dial to 11 ¼”; push the “font layer” feature key, then shift, then the key, which is the second key on the top row. Page 22 in the booklet. The heart shapes can be found on page 69 of the booklet.
October 6, 2011 - DH
Cricut Shape-A-Day #5
Are you seeing stars? Perfectly pointy stars are a snap! Cut them in a multitude of sizes, layer them, stamp on them using coordinating star stamps – the possibilities are limitless!

Shape instructions: Press shift and then the far right key on the second row. The size dial was set to various sizes from 3” to ¾”. Page 40 in the booklet.
October 5, 2011 - DH
Monday, October 17, 2011
Cricut Shape-A-Day Day #4

Shape instructions: Set size to 1 ¾” for the larger dragonfly and 1 ¼” for the smaller. For the base shape, push shift and then the fourth button on the top row. For the layer, push the “layer” feature key, shift, and then the same key. Page 24 in your booklet.
October 4, 2011 - DH
October 4, 2011 - DH
Cricut Shape a Day #3
Shape instructions: Set the size to 10”; press the “font layer” feature key, shift, and then the button in the top left corner of the key pad overlay. Page 21 in the booklet.
October 3, 2011 - DH
Cricut Shape-A-Day #2

October 2, 2011 - DH
Friday, October 14, 2011
Announcing Cricut Shape A Day !!!
DAY #1
Our new Cricut Art Philosophy cartridge is already a big hit – I loved concepting this product and its multitude of shapes! That’s why, for the month of October, I’ll be sharing a new art project featuring a different Cricut shape every day. That’s right: thirty-one days, thirty-one pieces of artwork, each highlighting a different fabulous shape from the Art Philosophy collection! So, with no further ado, here comes the first shape!
The first piece of artwork I’d like to share with you is this elegant thinking of you card, touting one of the Art Philosophy cartridge’s tag shapes. Once cut, this shape was so easy to dress up using the perfectly coordinating image from the September Stamp of the Month set, Limited Edition.
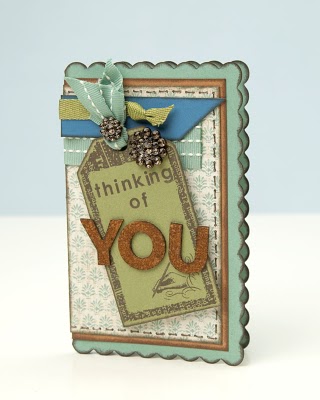
Shape instructions: create this tag by setting the size dial to 3 ½” and pushing the
Friday, September 2, 2011
Next Meeting
Remember due to the Holiday falling on our Monday Meeting day, we will be meeting on Monday September 12, 2011.
We will be sampling the Crunchmaster Multi-Seed Crackers! Yahoo! These crackers are gluten-free and are very calorie friendly.
I will need your responses to complete the survey so we will be chosen to sample other products as well.
Once again, your prompt response in letting me know if you are attending is most important.
Thanks and enjoy your weekend!
Labor Day Weekend
Hello Everyone,
I hope that everyone has a great and safe Labor Day Weekend. As we enjoy our long holiday weekend, please take time to remember our troops who serve us to make America Better.
Also, Hope everyone has a safe an healthy holiday weekend.
I hope that everyone has a great and safe Labor Day Weekend. As we enjoy our long holiday weekend, please take time to remember our troops who serve us to make America Better.
Also, Hope everyone has a safe an healthy holiday weekend.
Monday, July 25, 2011
Monday Madness
hello everyone,
well today we had a taco salad pot luck followed by a chocolate on chocolate birthday cake for one of our gals Sharon. It's her birthday tomorrow. So please take time to remember to wish her a happy birthday.
The Christmas cards that we made today were outstanding. I just loved all of them and were so simple to make. Thanks to Melissa for her designs.
Our next get together is in a couple of weeks due to vacations, etc.
We will be making the Kitchen Frame. Too hard to go by every one's Kitchen colors so it's a generic
frame kit. It's so cute and of course Melissa did outdo herself. I just wish we could get them personalized. What do you think Melissa???
All of you asked for the Margarita Recipe so here it is:
Here is the full recipe for: Margarita Mamas
It is from a book of mocktails for pregnant mommies. I will find out the title if anyone is interested.
Kosher salt (we use colored sugar)
12 oz frozen limeade
6 oz orange juice
10 oz water
2 oz peach juice
8 oz ginger ale
1 cup ice
6 lime wedges
Pour the kosher salt on a plate, rub the rim of each of six glasses with a lime wedge, and dip the rims to coat with salt. Pour the limeade, orange juice, water, peach juice, ginger ale, and ice into a blender and blend until smooth. Serve in the salted margarita glasses, garnished with a lime wedge. Makes 6 servings (that is actually true....6 servings in a margarita glass!!!)
mmm soo good!!!
Well until tomorrow, have a safe night and keep cool in these "dog days of summer"
~Di
Subscribe to:
Posts (Atom)